
People generally don’t come to me for advice, but when they do it’s almost always about taking selfies (or eyeliner). I’ve been labelled as a selfie addict and a selfie queen, but let me tell you—there’s waaaay more to a good selfie than just pressing a button on a screen. So, for those who haven’t quite mastered the selfie, have no fear–you’re about to master in in less than ten minutes, I promise.
So, I introduce to you my three part in-depth series that I’d like to call “The Ultimate Guide To Selfie Taking: How To Take The Perfect Selfie.” Here’s part one: taking the selfie.
1. Front-facing camera.
Phones have evolved—especially the iPhone. The front-facing camera is high quality and should be used when taking selfies because you can see exactly what you’re going to end up with. With this being said—don’t look at the screen image of yourself while taking a photo, look into the lens. When you look at the screen your eyes in the photo are not looking at the camera.
2. Form.
The camera should be slightly above you—not at exact eye level and definitely not below you. When the camera is below you it gives you that “I’m a mom who just turned her phone on and isn’t sure what a selfie is” look and if it’s a little too high it gives you a sort of weird day dream look.
Having the picture at eye level will make the photo a little bit awkward and having it below you will just be generally unflattering. You want your arm to be at slightly wider than a 90 degree angle; a slightly obtuse right angle like in the picture below:
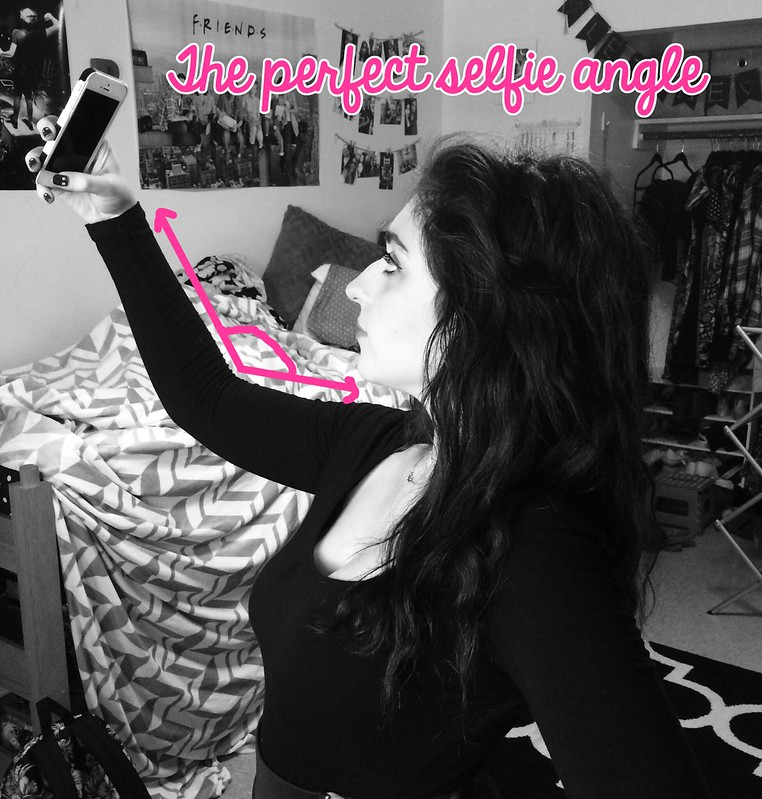
Using ~math~ to discuss selfie-taking, how classy is that? The phone should also be fairly close to you, about the distance between your shoulder to wrist away.
3. Lighting.
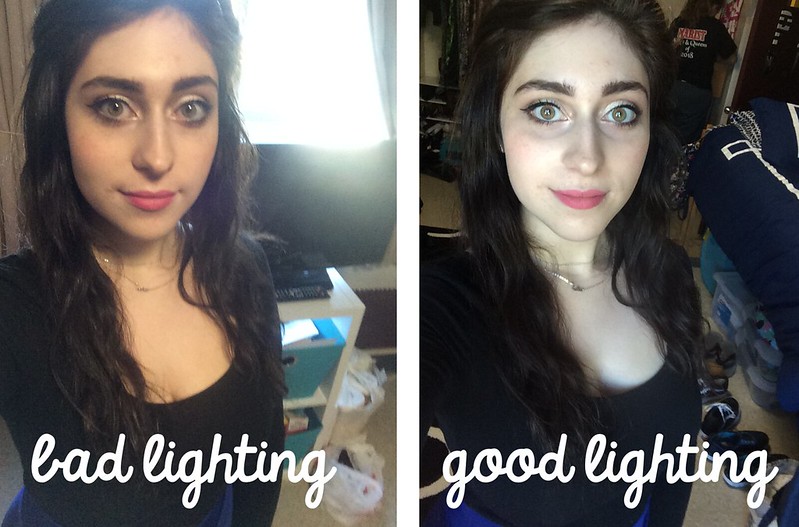
First of all, make sure you are facing the light source. When your back is to the light source, it makes you look overly shadow-y and like a dark blob. Face the light and if the light is too strong and washes you out, step back or use a different light source. The only difference between the two photos below is that in the first one I had my back to the window and in the second photo I am facing it. See how much of a difference light makes?
Also, natural daylight is the prime lighting. If it’s a nice and sunny day, take your selfie outdoors! The outside lighting is the best you can possibly get. Indoor lighting at night or outside at night is the worst light you can have. Avoid it at all costs.
4. Effortless expression.
Of course, expression all depends on what image you wish to portray or what sort of selfie you’re taking but ultimately keep it effortless. A smile, a coy eyebrow slightly raised, a little bit of Tyra Banks smize…something simple! Avoid the duck face and avoid having a blank expression. Also avoid looking confused or too fake. If you want to capture a genuine smile, look at something or someone that makes you happy before taking a selfie. It’s easy to see the difference between fake, posed smiles and real smiles. Find out which expression suits you best and always try a bunch of different ones—keep it fun!
5. Staging.
Staging the selfie is super important. Be sure to take your clothing into consideration.Wearing something strapless? Make sure you get part of your shirt in the photo so you don’t look entirely nude (unless that’s what you’re going for). Wearing an AWESOME shirt? Alter your angle slightly in order to get some of it in the photo. A great necklace is also the perfect selfie “prop” because it’s bound to be in the picture.
Also consider your background. Outdoor selfies always have great lighting AND background potential. Trees, clouds, the city, flowers…so many great options! If you have a nice background and want it to be a slight focal point be sure to hold the phone further away to get more of the background. If you’re taking a classic bathroom selfie be sure to move so there’s not a toilet right behind you. Be aware of what’s behind you and avoid really busy backgrounds. YOU want to be the focus of your selfie!
6. Options.
When having your little “selfie photoshoot” be sure to do various poses. Maybe have some with a coy expression, some with your hair up, hair down, hair behind you, trees in the background, wall in the background…The more you take, the more you have to choose from. This helps account for horrible expressions, blinking and just bad photos. It’s rare to take the perfect selfie on the first try!
That concludes part one of the ultimate guide to taking selfies! Here’s Part Two: Editing the Selfie and Part Three: Posting the selfie.


What a handy little list! Out of all of these tips, I think that light is the most important for taking a good selfie, or any other photo for that matter!
Rae | Love from Berlin
I totally agree, light is make or break in every picture!